
Browsing the Network | Logging into the Network | Browsing the Server | Change Novell Password
NDS
The NetWare database of network information. It defines every object on the
network, such as users, groups, printers, print queues, servers, and volumes.
NDS Tree
The logical representation of the objects in the NDS database. Using container
objects, you can organize objects in the database so that they are grouped into
separate branches on the tree.
Name Context
This refers to the specific location in the NDS tree where an object resides.
The address of that location consists of the names of any container objects
over that object, separated by periods.
The TCNJ Network
In the past, each of the academic and administrative departments had a network
server that was accessed by the members of that department. Our Novell network
is no longer organized departmentally; instead, it is organized by usage. There
is a server dedicated to the labs, one for the faculty and one for SAL applications.
There are also other servers for administrative offices and to run specific
tasks such as web servers and CDROM servers. Below is a list of servers affecting
the labs, followed by a diagram of our network tree and name contexts.
TCNJ Tree, Servers and Contexts
| Server Name | Purpose | Who Has Rights |
| TCNJ10 | Administrative Server | Administrative Staff |
| TCNJ11 | SAL Applications Server | Everyone on campus |
| TCNJ12 | Faculty Server | Faculty and Staff |
| TCNJ33 | ResNet/Student Server |
All students with valid Novell accounts |
| Login Type | Context |
| Administrative Staff | .adm.tsc |
| Faculty | .fac.ewg.tsc |
| Students | insert_alphabetical_name_see_below.st.ewg.tsc |
Students contexts are figured by the first letter in their last name. Context is broken up in these groups (see tree above): AC, DH, IN, OR, SZ. Their context will be .alphabetical_list.ST.EWG.TSC.
Ex.: a student with the login name "Smith" would start their context name with the context group that "Smith" falls in. "Smith" falls under .SZ (S through Z), therefore their context would be .sz.st.ewg.tsc.
Using My Network Places is very similar to using My Computer. My Network Places allows you to browse the network for servers and printers which are available to you. My Network Places can be accessed directly from the desktop by double-clicking on the My Network Places icon. You should see something like the following when you open My Network Places.

If you would like to change the way network resources are displayed, you may go to the View menu and choose among large icons, small icons, list, or details format. You may also go to the View menu and place a checkmark next to the Toolbar selection in order to use the toolbar to navigate the network.
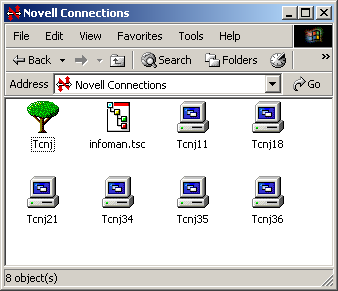
You will notice an icon labeled Novell Connections. Double-clicking on it should display something similar to the following, though you may see different servers depending on your login.
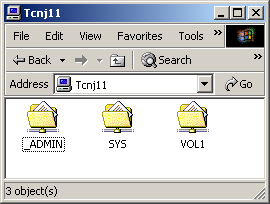
Double-clicking on any server will bring up a list of all volumes on that server and should look something like the following.
One thing to keep in mind is that even though you might be able to view all of the servers and their volumes on TCNJ’s network, you will not have rights to view files or folders on those volumes unless you have been granted rights to them.
Contexts and Logging into the Network
In order to log into the network, you must know the name of the context that you wish to log into.
When you first sit down at a computer in a lab, you should see a screen prompting you to press Ctl, Alt, Del to login. Press all three keys and you should see the following login screen:

Once you get to this login box you must type your user name (same as your UNIX user name) and your password to login to the network. Type your user name in the "Username" field, then press Tab. As the cursor switches to the "Password" field, the login service will automatically search the network for your user account and proper context.
Double-clicking on the server icon once you are logged in will bring up a list of volumes available on that server.
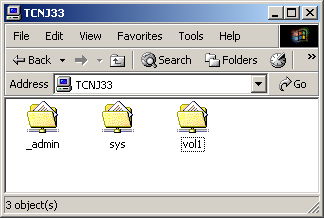
Double-clicking on a volume will allow you to browse the directories on that volume. Your account must be authorized for access on each server in order to access it's resources. You will only be able to see those directories that you have access to.
Vol1 is a volume which can be found on every network server. This volume contains all of the applications which are available on the server as well as shared resources and user directories. You may access this volume and all of its contents by double-clicking on the vol1 icon.
Mapping a Network Drive
You can think of mapping a network drive as making a shortcut to a particular location on the server. When you map a drive, you assign a drive letter to a network resource, such as a drive or folder. Some resources, such as your user directory and the applications directory are automatically mapped for you when you login to the server. However, once you are logged into a server, you may make your own drive mappings by right clicking on a volume or directory on that server. This will open up the pop-up menu with one of the choices being Novell map network drive. When you choose to map the drive, Windows will find the next available drive letter for you to use by default. If you wish to use a different letter, you may select another letter from the drop-down list.
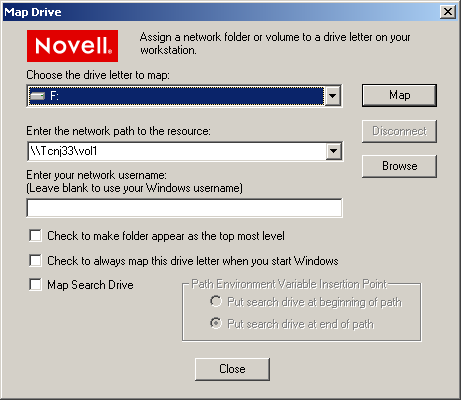
In the previous example, Windows has chosen Drive F to represent the desired path, which is TCNJ33\Vol1\Users. If you decide that you want this particular mapping to remain when you login in the future, you must make sure that you have checked the Check to always map this drive letter when you start Windows box.
You may view a list of your drive mappings by double-clicking on the My Computer icon on the desktop. You should notice all of your local drives, as well as your network drives.
If you wish to unmap a network drive, you must right-click
on the drive icon in My Computer. Choose disconnect from the
pop-up menu and the drive icon will disappear. You should only use the disconnect
command to unmap drives that you have created yourself. You need to be careful
not to disconnect mapped drives that were created when you logged into the network.
Changing your Network Password and Logging Off
In order to change your network password you must first be logged in to Novell. At any time, hold down the Ctrl - Alt - Delete keys at the same time. This will open a open a window allowing you the option to choose Change Password. In the next window enter your old password in the box provided under the heading "old password". Tab or mouse-click to the next box to enter your new desired password. Repeat this step and reenter your new password in the last box. This ensures that you have typed your new password correctly. When finished, click the OK button. Provided all passwords were entered correctly, a message box will pop up indicating that, "Passwords for all selected resources were successfully changed". Click OK to return to Windows.
To log off of the network, choose Start followed by Shut Down. Then from the drop down menu choose Logoff, Shut down or Restart.
Enjoy!